Big Honking Button User Guide#
Big Honking Button is, well, a big button that honks. Okay, that's not all- it’s actually a simple sampler in a very silly package. It has pitch CV, gate in, gate out, and you can store up to 4mb of samples on it.
Getting support and help#
We want you to have a wonderful experience with your module. If you need help or run into problems, please reach out to us. Email is the best way for product issues, whereas Discord and GitHub are great for getting advice and help on how to customize your module.
Installing the module#
To install this into your Eurorack setup:
- Connect a Eurorack power cable to your power supply and the back of the module. Note that even though the power connector on the module is keyed, double check that the red stripe is on the side labeled
red stripe! - Screw the module to your rack's rails.
Inputs and outputs#
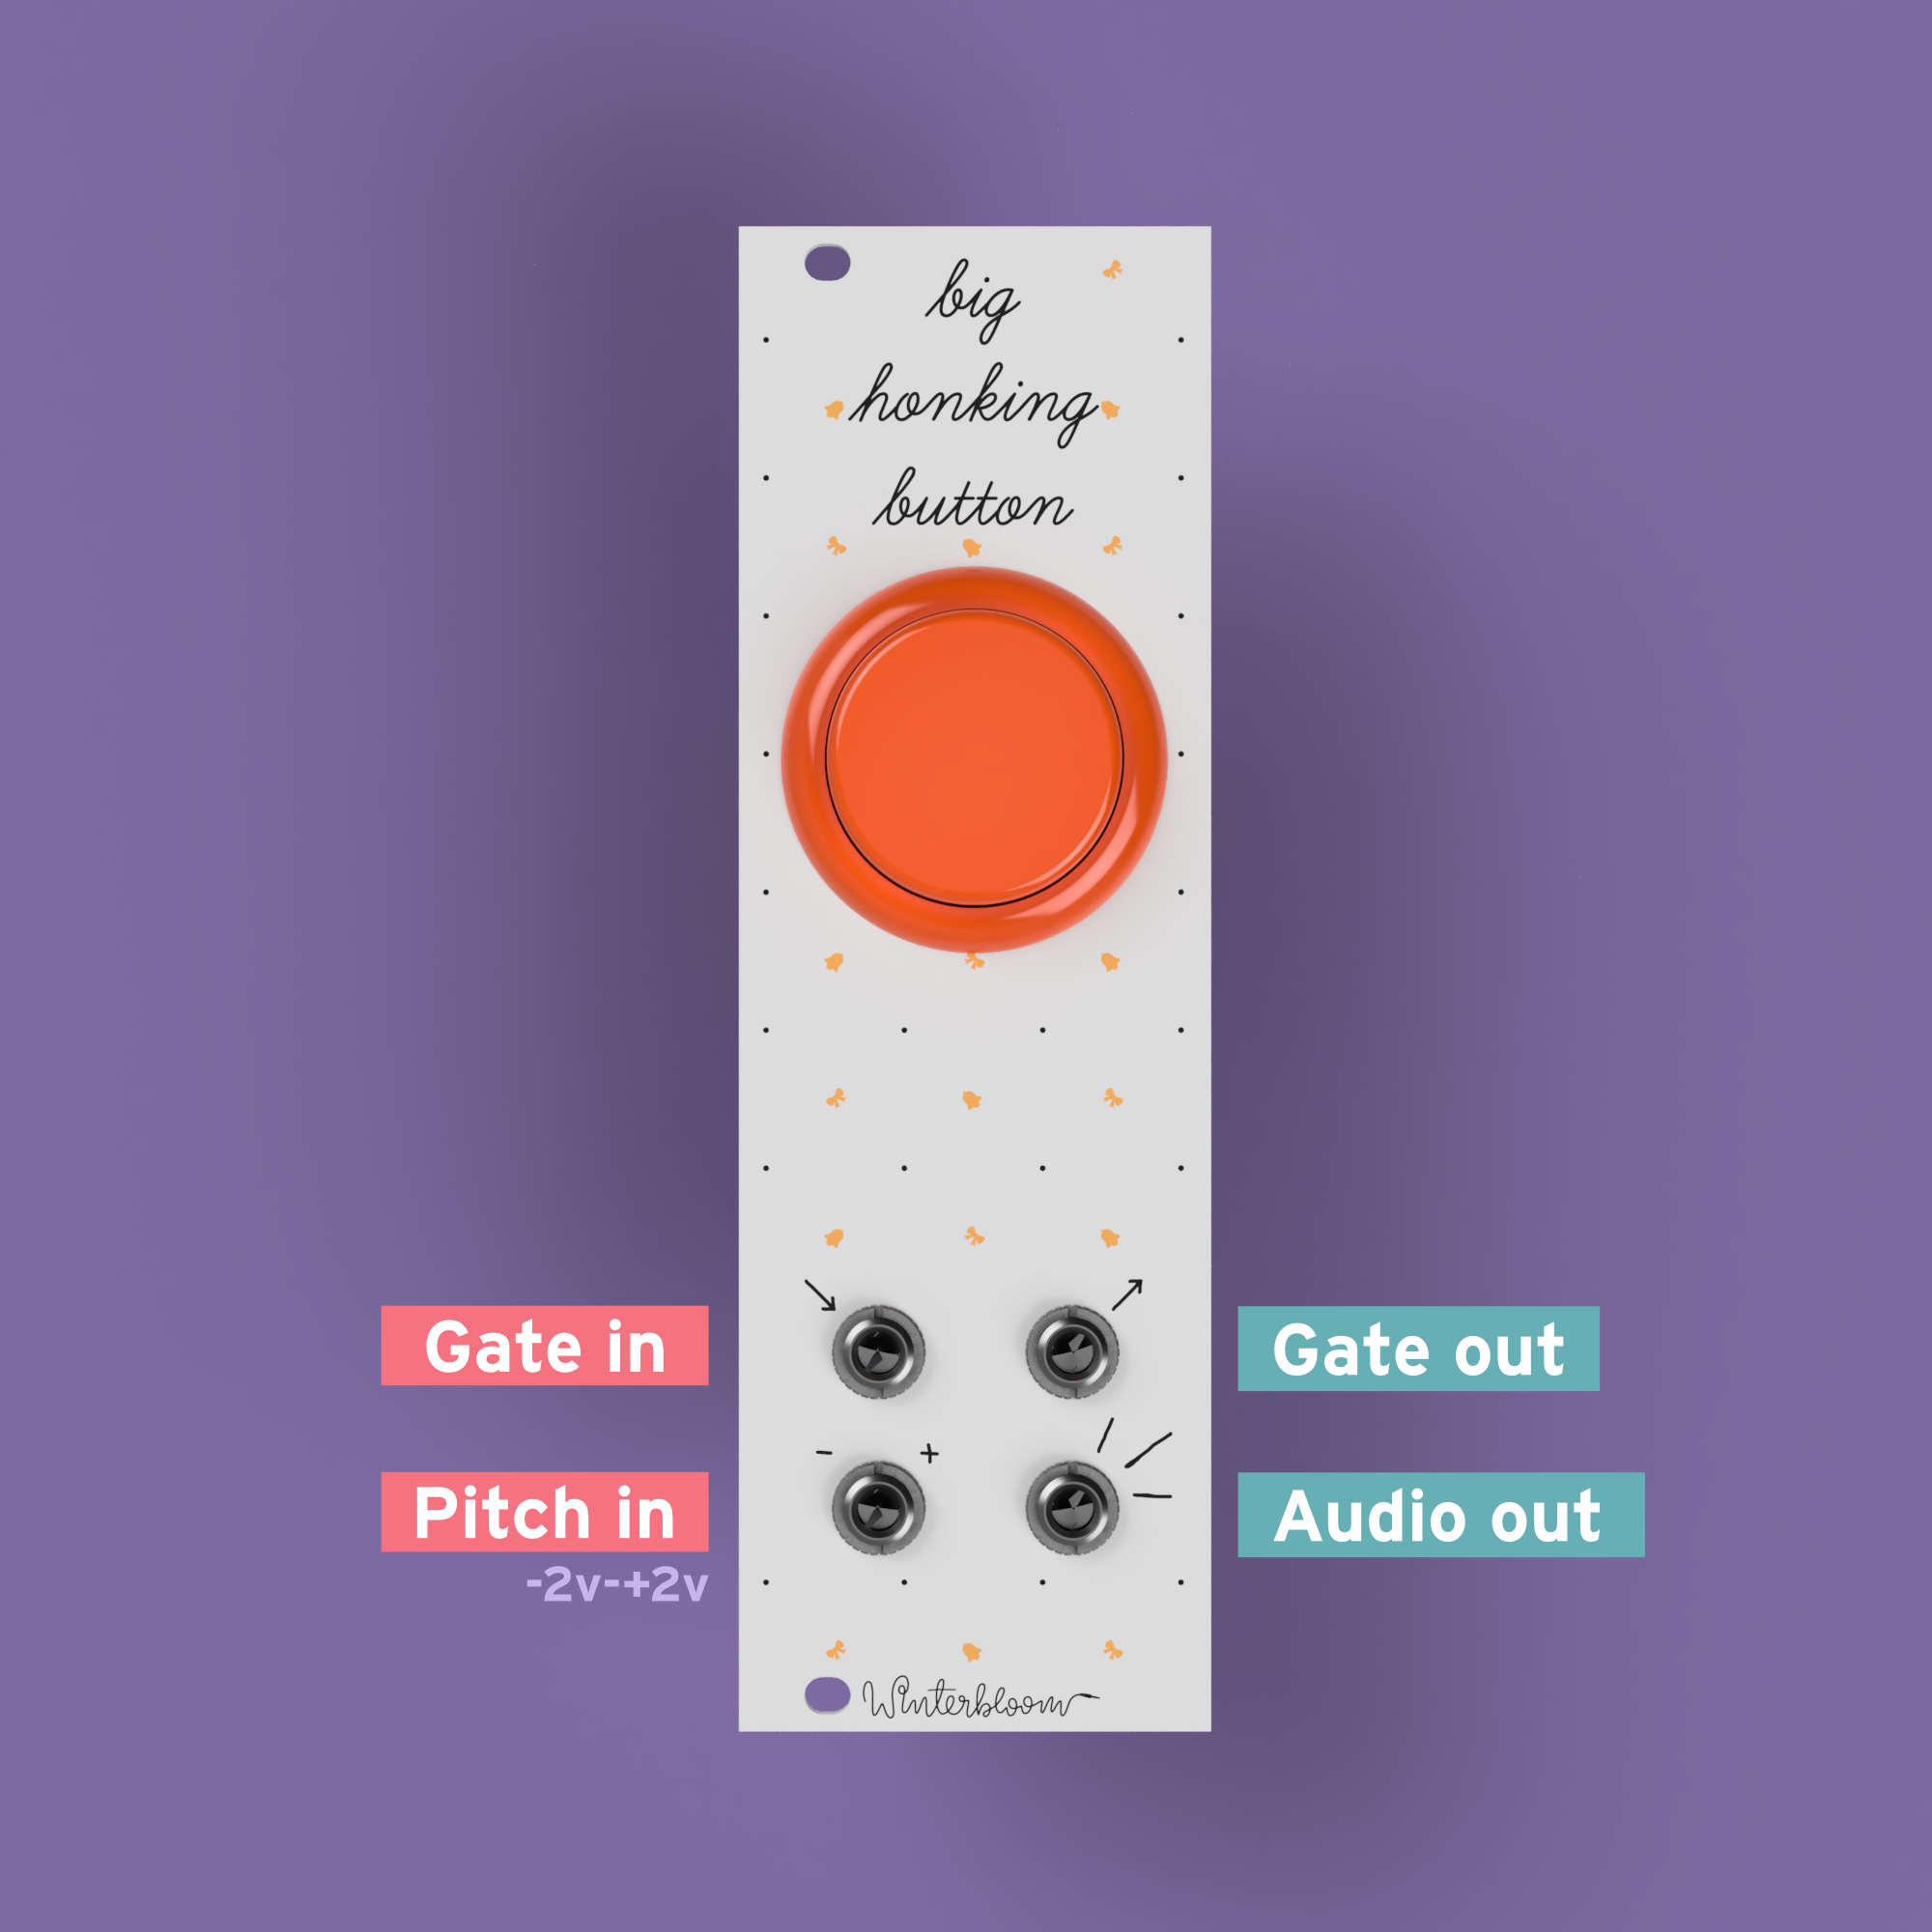
Big Honking Button has two inputs:
- A gate / trigger in
- A pitch CV in that is 1v/Oct with a
-5vto+5vrangesee note
And two outputs:
- A gate / trigger out (
0vor5v) - An audio out
With the default code, it will trigger the sample and play it through the audio out whenever the button is pressed or whenever the gate input is triggered. It will also set the gate out to high whenever the button is pressed or whenever the gate in is high. You can customize some of this behavior by modifying the code.
Revision differences
Big Honking Buttons manufactured prior to 2021 (marked v4 on the backside) only have an input range of -2v to +2v. More than that won't damage the module, but it won't be able to measure anything outside of that range.
Changing the sample#
You can change the sample on Big Honking Button by connecting it to your computer via a micro USB cable. The USB port is located on the module's main circuit board, located under the panel. Please note that you do have to power the module in order for the USB connection to work - the module doesn't draw any power from the USB port.
Samples must be in mono, 16-bit, 44.1kHz, signed wav files. Adafruit has an excellent guide on how to convert sound files, though your sample can be 44.1kHz and not 22kHz.
To modify the sample that plays:
- Connect the Big Honking Button to your computer using a micro USB cable. It should show up as a small external drive named
CIRCUITPY - Navigate to the
samplesfolder in the drive - Rename or delete the existing
honk.wavfile - Copy your sample over and rename it to
honk.wav
Your Big Honking Button will reboot and then it should play the new sample! If you run into trouble, please reach out.
You can store and play multiple samples on the Big Honking Button, but to do that, you'll need to learn how to modify some of the code - don't worry! It's not too hard.
Modifying the code#
When connected to your computer, Big Honking Button shows up as a small drive named CIRCUITPY. In that drive, you should find a file named code.py. Big Honking Button runs CircuitPython which means that its firmware is written in the approachable Python programming language and you don't need any special knowledge or compilers to make changes to it. So, open up that file in your favorite text editor, we're going to make some changes!
If you don't have a text editor - that's okay! While you could use Notepad (Windows) or TextEdit (Mac), these can sometimes have issues with CircuitPython devices like Big Honking Button. I'd recommend installing Mu if you're new to this whole world. You can read more about editing code for CircuitPython in Adafruit's guide.
As a way to get your feet let's change how the Big Honking Button behaves. By default, when you press the button it plays the entire sample, even if you release the button while the sample is still playing (this is trigger mode). This will make it where the sample will stop as soon as you let go of the button (or gate mode).
In the code.py you should see some code that looks like this (it's at the bottom):
if bhb.released:
    bhb.gate_out = False
    # Uncomment the call to stop to make the sample
    # stop playing as soon as you release the button.
    # bhb.stop()
Modify this code so that it looks like this:
if bhb.released:
    bhb.gate_out = False
    # Uncomment the call to stop to make the sample
    # stop playing as soon as you release the button.
    bhb.stop()
Be careful
Python is whitespace-sensitive. That means tabs and spaces are important! Make sure that you don't accidentally change the indentation level of this line.
Okay, save the file! Your Big Honking Button should restart and now it should stop the sample as soon as you let go of the button, try pressing it rapidly to see the effect.
Tip
If things aren't working, see the section below on finding problems or reach out!
Congrats, you've made your first change to how the module works! 🎉
Big Honking Button can do all sorts of neat stuff by changing its code. Check out the examples or jump in the deep end with the code reference. Don't be afraid to experiment and reach out if you need any help!
If you want to you can learn more about CircuitPython to the most of your module. Also, please come chat on the Discord where you can ask questions and see what others are doing with their Big Honking Button!
Examples#
Big Honking Button can do all sorts of things! We've made a few examples to show you some of the things it can do:
To use these examples, connect your Big Honking Button to your computer just like you would when modifying the code. Once connected, copy the contents of the example you want to try (linked below) to code.py on the CIRCUITPY drive. Be sure to save it as the correct name, if you don't name it code.py it won't change anything. If you want to restore the original code.py it is here.
- Cycle example: Shows how to load multiple samples and cycle between them.
- Random example: Shows how to load multiple samples and choose one at random.
- CV select example: Shows how to load multiple samples and use the CV input to select which one to play.
- Press & release example shows how to play a different sample when pressing the button and releasing the button.
- Separate button & gate example shows how to play a different sample depending on if the button was pressed or the gate in was triggered.
- Burst example shows how to play a "burst" of samples when the button is pressed.
- Tap tempo example: Shows how to use the button to set the tempo and have the module play back a sample at each beat.
- Sine example: An advanced example that shows how to generate a custom waveform.
- Noise example: An advanced example that shows how to generate noise.
If you're ready to go beyond the examples, check out the code reference.
Help! I changed some code and this thing isn't working!#
There's probably some sort of error in the program. Don't worry, you can get it figured out.
If you connect using the serial console you should be able to see the error. If you don't see it right away, you might need to reset the board (either by pressing the little button on the bottom of the module or power cycling your synth). Sometimes you can press Ctrl+C followed by Ctrl+D in the serial console to get the board to reset and tell you the error.
In any case, reach out on Discord and we can walk you through figuring out what went wrong.
Code reference#
Big Honking Button runs CircuitPython and provides a helpful BigHonkingButton class for accessing the hardware and features. The first thing that you'll do in your code is import that class and create an instance:
import winterbloom_bhb

bhb = winterbloom_bhb.BigHonkingButton()
In a lot of cases, the first thing you'll do with the bhb instance is load some samples:
honk = bhb.load_sample("samples/honk.wav")
clap = bhb.load_sample("samples/clap.wav")
Once you're all set up, you'll start the update loop:
while bhb.update():
    ...
This loop will repeat over and over. Each time the loop is run, bhb.update() is called and it will read in the state of the button, gate in, and CV input. You have to call bhb.update() otherwise it won't ever know if things change!
Inputs#
While inside the loop you can check the state of the various inputs. First, you can check if either the button has been pressed or the gate in has gone from low to high:
if bhb.triggered:
    ...
Similarly, you can check if either the button has been released or the gate has gone from high to low:
if bhb.released:
    ...
These two states are demonstrated in the default example:
while bhb.update():
    if bhb.triggered:
        bhb.play("honk.wav")

    elif bhb.released:
        bhb.stop()
You can get more specific by checking the button and gate independently. You
can use the button property to check the button:
if bhb.button.pressed:
    # Button was just pressed.
    ...

if bhb.button.released:
    # Button was just released.
    ...

if bhb.button:
    # Button is held down.
Likewise, you can use the gate_in property to check the gate input:
if bhb.gate_in.rising_edge:
    # Gate in just moved from low to high.
    ...

if bhb.gate_in.falling_edge:
    # Gate in just moved from high to low.
    ...

if bhb.gate_in:
    # The gate input is being held high.
Aliases
For convenience, bhb.button and bhb.gate_in have property aliases. .pressed, .rising_edge, and .triggered are all the same, likewise, .released and .falling_edge are the same.
The pitch CV input is a little different. You can use bhb.pitch_in to read the voltage on the pitch CV input. Remember, the input range is -5v to +5v.
if bhb.pitch_in > 0:
    ...
More usefully you can use the pitch input to re-pitch the sample:
bhb.play(honk, pitch_cv=bhb.pitch_in)
There are other ways you can use the CV input, for instance, the CV select example uses it to select from a list of samples.
Outputs#
Big Honking Button has two outputs: an audio out and a gate out. The audio out can be used to play previously-loaded samples:
bhb.play(honk)
It can also play the sample repeatedly:
bhb.play(honk, repeat=True)
And re-pitch the sample:
# Play at twice the frequency
bhb.play(honk, pitch_cv=2.0)

# Play at half the frequency
bhb.play(honk, pitch_cv=0.5)

# Play at normal pitch
bhb.play(honk, pitch_cv=1.0)
By default, the sample will play all the way through. If you want to stop the
sample you can use bhb.stop():
if bhb.pressed:
    bhb.play(some_long_sample)

elif bhb.released:
    bhb.stop()
When stop() is called the sample stops playing immediately - even if its in the middle of playback. If you play a new sample while a sample is playing, the old sample will stop immediately and the new one will start playing.
Finally, there's the gate out:
if bhb.pressed:
    # Sets the output to +5v
    bhb.gate_out = True

elif bhb.released:
    # Sets the output to 0v
    bhb.gate_out = False
Updating the firmware#
Updating the firmware requires two steps: Updating CircuitPython and updating Big Honking Button's libraries.
Updating CircuitPython#
- Download the latest version of CircuitPython for Winterbloom Big Honking Button.
- Connect Big Honking Button to your computer via USB. The USB port is located underneath the panel. Note that you still have to power the module from a Eurorack power supply.
- Place Big Honking Button in bootloader mode by pressing the reset button twice quickly. The reset button is located on the bottom of the module just below the power connector. Once in bootloader mode, you should see a drive on your computer named
HONKBOOT. - Copy the
uf2file from step 1 to theHONKBOOTdrive. The module should restart by itself.
Updating Big Honking Button's libraries#
- Download the latest release bundle for Big Honking Button.
- Unzip the release bundle, and then copy the contents to Big Honking Button's
CIRCUITPYdrive, replacing any existing files. - Reboot Big Honking Button by power cycling your synthesizer or pressing the reset button again.
Open source hardware & software#
Big Honking Button is completely open source and hacking is encouraged.
- The firmware is available under the MIT License.
- The hardware design is available under the CC BY-SA 4.0 License and is designed using KiCAD which is free and open-source. You can open the hardware files using KiCAD or you can check out a PDF of the schematic.
- CircuitPython is available under the MIT License.
 Big Honking Button is certified open source hardware.
Warranty, disclaimers, and limits#
Modules purchased from Winterbloom have a warranty of six months from the date of purchase. This warranty covers any manufacturing defects in the module. It does not cover damage from due to incorrect handling, storage, or power, overvoltage events, or modifications.
Please contact us if you are experiencing issues with your module. Modules returned under warranty will either be refunded, replaced, or repaired at our discretion. You will be responsible for the cost of returning the module to Winterbloom.
Because Eurorack has a vast number of possible combinations of power supplies, modules, cases, and accessories, it is impossible for us to guarantee compatibility with every possible configuration. We make a reasonable effort to test modules with several power supplies, cases, and other modules.
We encourage tinkering, however, we will not refund, repair, or replace any products that have been modified.
Acknowledgments and thanks#
Big Honking Button would not be possible without the help of the CircuitPython community and Adafruit Industries.